Perhaps you have heard about potting? What is it? Where is it applied and how is potting done? If you want to know the steps of using potting materials, you are reading a perfect article. This guide will take you through the use of potting epoxy resins. We will help you understand:

Epoxy potting compound
The epoxy curing process
How to know a thoroughly cured epoxy
Epoxy coating process
How to apply subsequent epoxy coats
Keep reading this guide on seven easy steps to use potting epoxy resins.
What is Potting?
Potting refers to a method of enclosing an electronic component with a compound. The compound offers permanent, additional protection. Varying potting compounds have different cure conditions, required viscosities, and other properties. Resin and hardener combination is among the popular potting compounds. Let us dive into the steps of using potting epoxy resin.
We shall use Printed Circuit Board (PCB) potting using epoxy resin as our example to explain the steps
1. Gather the Materials You Will Use
Before you begin the potting process, you should gather the equipment you will use. Make sure you have all the materials in one place to avoid unnecessary movements. You need a mixing cup, mixing stick, disposable gloves, and graduated measuring cylinders. Make sure you have a means of eye protection. If your project is production process, you will need prepare automatic potting machine.Epoxy resin can be harmful to your health if not carefully handled.
Of course the PCB you want to pot should be near you. The un-potted PCB board is similar to the one below:

2. Selecting the Best Potting Epoxy Resin
Before beginning the process of potting, you have to select the best resin for your project. You can compare different brands of epoxy resin. You should note that projects differ. Thus, the brands for epoxy required for each could be different. So what factors should you consider when selecting the best epoxy resin? Simply check the following:
The potting resin Properties
Primary bonding relies on the nature of the bonding surfaces. Choose the epoxy brand that can adhere to the surface you want to pot.
The Ambient Temperature of the potting Epoxy Resin
Some brands of epoxy resin cure at lower temperatures than others. Check the temperature of your place. If you come from hot areas, choose the epoxy resin that cures at high temperatures. Considering the epoxy’s temperature will help you reduce the epoxy cure time.
Chemical Reaction
One of the primary goals of potting materials is to resist chemical reactions. The chemicals could be from the environment or another device. Select epoxy brand which is chemical resistant.
Fortunately, most epoxy resin brands meet the above criteria.
3. Measure the Resin and Hardener
Use the Calibrated Cylinder to Measure the Components of the Mixture
The volumes depend on the quantity of epoxy mixture you want for the project. To avoid partially cured epoxy resin, mix the epoxy and hardener in the ratio of 2:1. So, two volumes of epoxy resin will be mixed with one volume of the hardener. Start by pouring the resin followed by the hardener.
Ensure that you accurately measure the required quantity. Read the calibrated cylinder at the bottom of the meniscus to enhance accuracy. Check the diagram below:
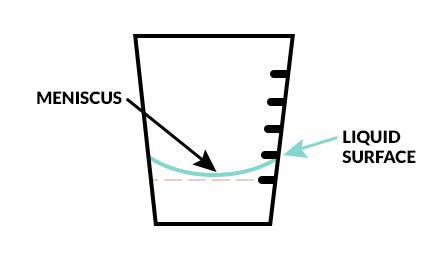
When taking the reading, you should read the bottom of the curve (meniscus).
4. The Mixing Process
For the epoxy to cure correctly, the resin and hardener should be measured and mixed well. To mix your resin and hardener, follow the following simple steps:
Mix the Resin and Hardener Molecules by stirring
Once you’ve poured the two resin and hardeners in the right proportions, you stir them together. Take at least two to three minutes to stir the mixture thoroughly
To ensure that all hardener and resin get mixed in, scrape the sides, corners, and bottom of the container. You can scrap multiple times. All of the hardeners will be mixed into the epoxy and the resin will cure perfectly
Be sure to scrape the sides of the measuring cup as well. Mixing is not complete if the mixture still has streaks of unmixed material
5. Prepare the Application Surface
Bonding surfaces should be clean, dry, and sanded for optimal secondary (mechanical) adhesion. To prepare the PCB surface well, you need to know how epoxy resin adheres to the surface. During the potting process, there is chemical bonding and mechanical bonding.
Note that the potting compound like epoxy resin does not conduct electricity. So it does not affect the working of the PCB.
What Is Mechanical Bonding?
Epoxy resin forms mechanical bonding when an epoxy layer is applied over a fully cured epoxy. These mechanical bonds formed when epoxy “keys” into pores. It can also fill tiny cracks on the surface being applied. Thus, the bonds are mechanical in nature. Mechanical bonds are also called secondary bonds. A secondary bond requires a properly prepared surface. Thus, cleaning and texturing the surface are required. At the end of the preparation should be strong adhesive bonds between the surfaces.
What Is Chemical Bonding
Chemical bonding occurs when a layer of fresh epoxy is applied to another layer that is not fully cured. For primary bonding to take place:
The molecules of the one resin layer and hardener react with the resin and hardener of another layer.
The reaction leads to layers of epoxy curing simultaneously. Therefore, they combine into a single, solid layer.
To apply new epoxy over epoxy that is partially cured, you don’t have to prepare the surface. However, primary bonding cannot occur after an epoxy layer has been cured. Next, you’ll need to get the surface ready for the epoxy layers that will follow.
In our case, you can use a blower or a thin brush to wipe away any dust from the surface of the PCB.
6. Applying The Epoxy resin
After your epoxy is fully mixed, you can begin the application process. The diagram below shows a PCB, ready for the application of epoxy resin. Unlike encapsulation, the pot used during epoxy potting becomes part of the final product.
Take note of the following:
Do not apply epoxy resin under cold temperatures or high humidity. Both temperature and humidity affect entropy resins
Use a squeegee for applying a thin layer of epoxy resin first. Then, use a brush to do the finishing. This method will help in spreading the epoxy over a large area
The image below shows the mixture of epoxy resin is poured on the PCB for Potting:
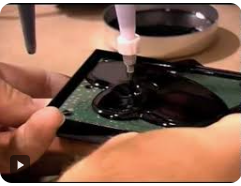
You can carefully pour the potting compound using your hands as shown below:
A thin brush like the one below can help you spread the epoxy over a large area.
In case there is a need to apply another epoxy coating, wait for some minutes first. After a while, you can start applying the subsequent layer
In some cases, you can use a pump to dispense the epoxy resin. Using a pump reduces the risks of errors in mixing the resin and hardener.
7. Curing Epoxy Resin
Epoxy resin undergoes curing to transform from a liquid to a solid state. In order for your epoxy to serve their intended purpose, the resin should completely cure. Twenty-four hours are enough for the curing of Craft Resin (depends on the thickness of your project). At this point, a chemical reaction takes place, turning the resin and hardener mixture into a solid.
Mixing resin and hardener, results in a chemical reaction. The reaction turns the liquid into a solid. The phase of change is called the curing time. Curing epoxy starts from a liquid to a gel and then a solid. During the curing process, stay around until the epoxy begins to tack. The temperature directly affects the curing time. The lower the temperature, the longer the time the epoxy takes to cure. There are three things that contribute to the epoxy’s temperature
The temperature from the environment commonly called ambient temperature
The surface temperature; where you are applying the epoxy resin
Exothermic heat emitted by the epoxy as it cures
For the epoxy resin applied on PCB to cure well,
Use a slower hardener to compensate for high temperatures. Also, you can make smaller amounts and use them up quickly. Moreover, you can increase the epoxy’s open time. This is by pouring it into a larger container (like a roller pan) to distribute the exothermic heat.
You can use a faster hardener or additional heat to work in cold weather. Such heat brings the epoxy up to a higher temperature. It should be higher than the minimum suggested application temperature for the hardener. Before or after applying epoxy, warm the resin with a hot air gun, heat lamp, or another heat source. Do not warm up hardeners before combining them with resins. Epoxy curing times can be speed up by using additional heat.
After twenty-four hours, you can use a hardness tester to ensure that the curing process is complete.
Precautions During Potting Process
A well-ventilated, fire-safe space is essential for productive work. As soon as you’re done using the resin, put the lid back on tight
If you touch your eyes with epoxy, it’s important to quickly wash them with a lot of clean, cold water. Also, you can get professional help
If it comes into contact with the skin, wash the area with soap and water
Keep out of reach of children
Conclusion
When deciding on a final coating, keeping the epoxy from UV light from the sun is important. The amount of UV filters in the finish determines the amount of UV light reaching the epoxy. When compared to a matte finish, a glossy one reflects a greater amount of the light that strikes it. A white coating (particularly a glossy white one) will survive the longest. Alkyd modified epoxy is a good substance that you can use in finishing.
After Thoughts
The use of epoxy for electronic potting is gaining popularity. At Resinoo, we offer different brands of epoxy. You can select the best brand that matches your project. To cater for different consumers, we have different packages as well. In case of a question, our epoxy specialists are just a call away. We are ready to help you any time. Feel free to contact us.